Tuesday 22 December 2015

Christmas Stockings

     A very long, time ago (back in the '50s) my Great Aunt Irene, who lived in Detroit, Michigan, purchased felt Christmas stockings ... I think they were from a women's church guild in Grosse Pointe. I am not sure what has happened to my brothers' and sister's stockings, but I still have mine ... a little worn out (the name had to be replaced, the candy cane is missing a stripe) but well loved.


      Years later, when my first daughter turned one, I made her a Christmas stocking. I hadn't yet started to quilt, so I used pre-quilted fabric and it was my first attempt at applique. A simple stocking for a little girl. I think someday, I should add her name to it.

      The following year, a 2nd daughter arrived and I created another stocking. That was the year I was into cross-stitch.  (Prior to the girls' births, I was into macrame ... I wonder what kind of stocking I would have come up with then??) Unfortunately, the toe didn't quite get the roundness I was going for. A prediction perhaps ... when she reached elementary school age, she loved trains; we had engines, cars and tracks winding through the family room!


      And that was the end of stockings for a very long while .... years later when Kate returned home along with her dog, of course, the dog required a stocking!

     This year, with the arrival of a grand-daughter, it was time to make a new stocking and while I was at it, make one for my step-granddaughter as well.
     Ari (age 6) loves My Little Pony and Minions, and since her Dad likes to rhyme her name with banana, that was added too. Ari informed me yesterday, that the Minion, named Steve, likes bananas too. I picked up a pre-made Christmas tree and star to add a little bling. The background is free-motion quilted and the pony, banana, name and minion are raw-edged machine appliqued with additional thread-painted details .... oh yes, and her favourite colour is purple!


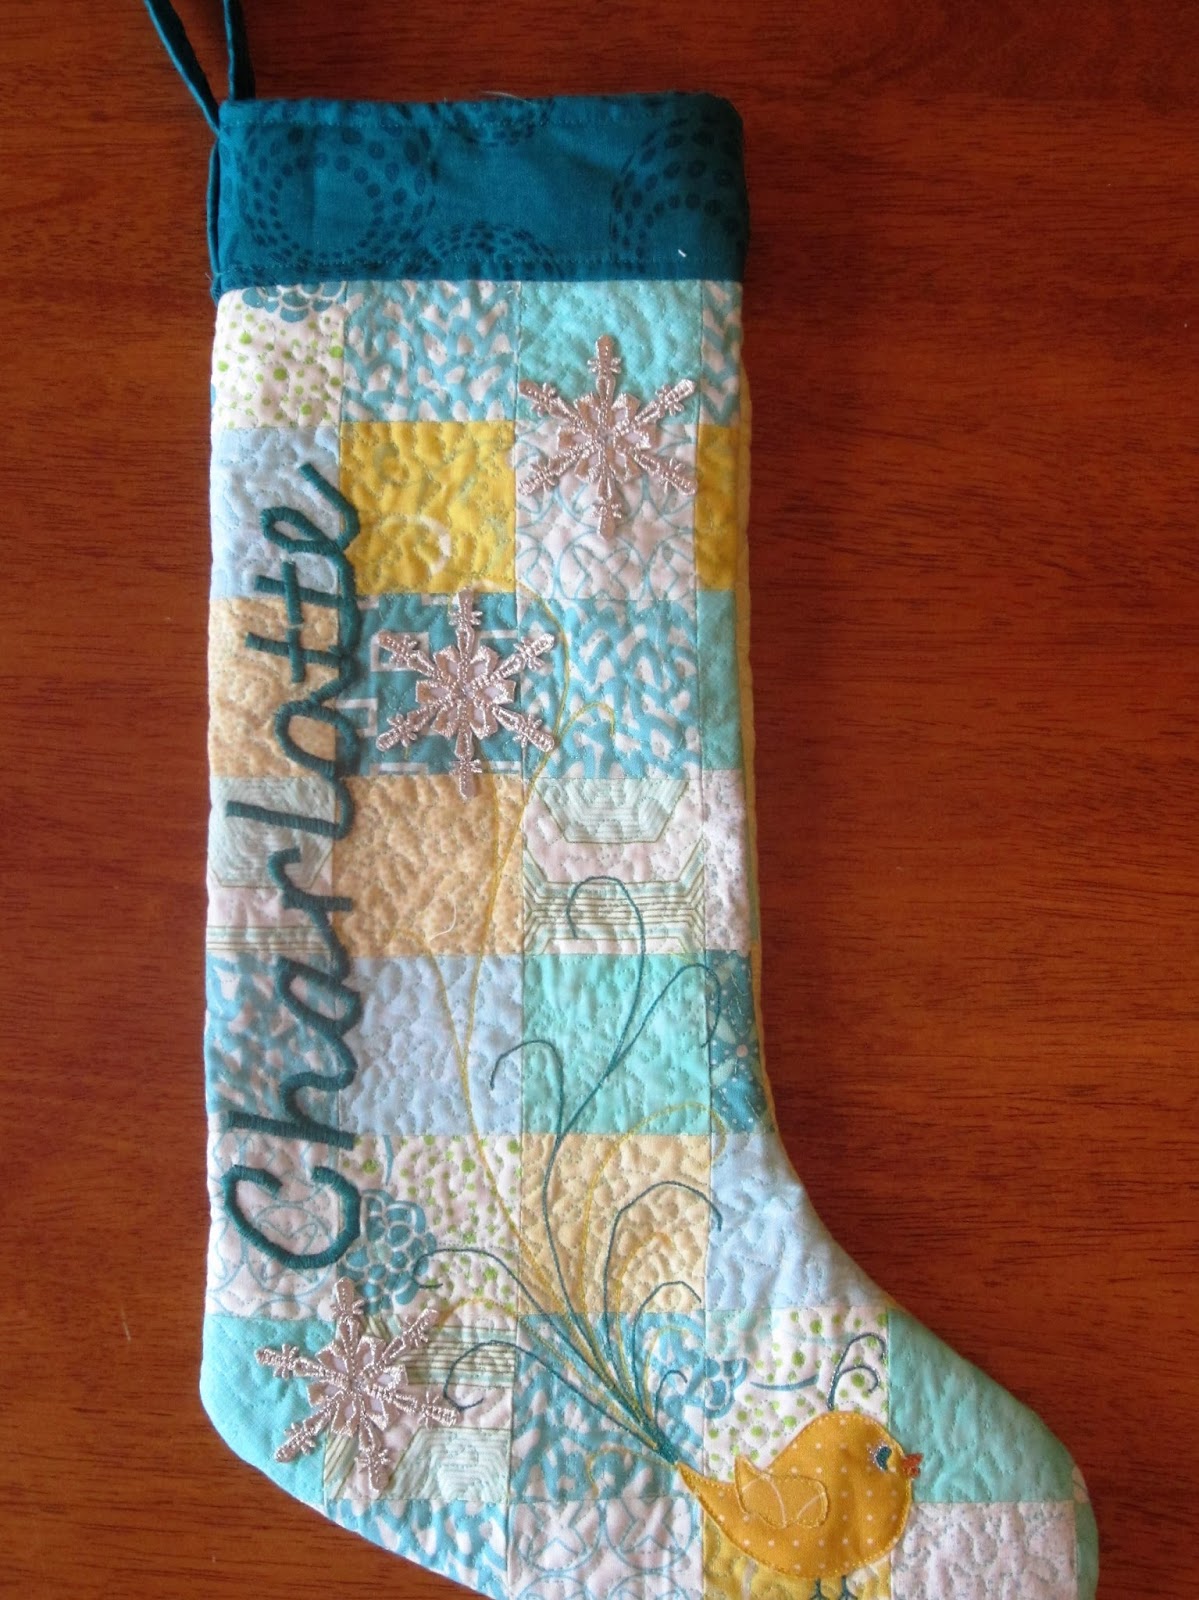
      Baby Charlotte doesn't yet have favourites, but her Dad calls her his 'little bird' (she made chirping noises during her first couple months of life). The colours coordinate with her bedroom colours and the quilt I made for her a year ago. The patchwork background is free-motion stipple; the name was a little more of a challenge (I don't have an embroidery machine) ... I penciled in her name along the side and then followed the markings with a satin-stitch.  I attempted making fabric snowflakes to applique but on a recent trip to a fabric store saw that they had beautiful silver snowflakes that worked much better.  It's hard to see but the little bird with its flowing tail has silver-thread highlights along some of the feathers and on the eye.

     That should have been the last stocking, but Kate decided at the last minute, if the girls were getting proper stockings, then her husband should have one too.  Using up fabric leftovers from my stash, and now using my expertise on stocking construction, one more stocking was created.


Saturday 19 December 2015

Christmas Preparations

Busy! Busy! Busy!  and all of a sudden it is a week before Christmas.
     My daughter, Liz, repainted her condo: Wild Water (a dark blue), Universal Grey, and Ophelia (a cream/beige colour) and decided she would like new cushion covers to match. She first told me that she wanted 2 cushions at 25 inches square ... but after making the top for one, I figured something wasn't right. I'd never seen cushions that size at her place. On Skype, I had her remeasure ... ooops, she meant to say 15 inch square cushions. And could I make them kind of geometric, .... I have worked on two 15 inch square cushions and two 16 inch cushion covers.
     This is based on a Delectable Mountain pattern ... I ended up making two covers the same since I wanted to use both the grey and the creamy-grey colour as the background to the blue ... which led to enough blocks for 2 cushions.
     Lesson learned: I am not that great at Y-corner seams .. resulting in quilting the whole darn thing to make it lie flat! I like the shadow look of the blocks.
     I used the same fabric for all 4 cushion covers. This was the block that was originally 25 inches. Originally the pattern repeated with 2 blue, 2 grey, and 2 beige on each corner block ... I eliminated the extra grey and beige and sewed each block through the centre to shrink the length. A bit of quilting on top and it is ready to be stuffed.
      The pillows are at her place, so it will likely be awhile before I get to see them 'finished'.
They are her Christmas gift ... but  I know she never checks my blog, so showing them here won't spoil the surprise.
     I wasn't quite done though. She also painted her bedroom .... and could I make some pillow cases in the same colours but add a bit of white too!


     They don't quite go with my bedspread .... probably should have turned it over and had a white background.  Two pillow cases have the same fabric as the living room cushions; two cases are plain navy/white/grey.

     More projects are being completed ... pictures to follow soon!


Thursday 19 November 2015

Black Rocks

    I am currently working on a piece which will hopefully be entered in the SAQA show called "My Corner of the World" ... haven't got a title for it yet. One of many picturesque sites in Nova Scotia is Peggy's Cove ... a place where, even with signs that say 'Stay off the black rocks', invariably a tourist gets swept into the water by rogue waves every year. Many do not survive. There is a debate on how to make the place safer without ruining the whole nature of Peggy's Cove. 
     In Nova Scotia (and likely all the maritime provinces) black rocks signify wet rocks. If a wave has already crashed on the wet, black rock you are standing on, then it will most certainly do it again.
     But ... the tourists are not from here.  What is the possibility that they don't understand the meaning of the signs??? Before I moved here, black rocks meant basalt, coal or even chromite. Even if a rock may appear black when it is wet, it does not mean it is a black rock.  Something to think about.

     So ... there are black rocks in my quilt; the tide had just started to go out. And this section along the rock pile is what I am most pleased about ... using a combination of dark brown and black threads & a variety of grey fabric, I have created my own east coast 'black rocks'!
     It is hard to decide how much tiny detail needs to added ... when to put in more or just stop!  When I took the photo, you could see waves breaking on a rocky shoreline on the far side of the bay, but I decided that a small bit looked better than all the way across.
     At the moment, I am still working on the shading of boats .... how much or not enough?? I have already taken out shading on one edge of the rust-coloured boat .... didn't like the look of it, so I will have to stare at the piece for awhile to decide what, if anything, needs to happen. Not sure if I like the bottom of the cream-coloured boat either. Hmmmm.

Sunday 1 November 2015

Colour Study 1 & 2

     Where has the time gone?? How did we get to November already??
     October was busy ... helping out my daughter & her family in their move, babysitting and dog-walking; making several pairs of footed pants for C. (so she can't pull off her socks in the cooler weather); a new quilted play mat  for C; refitting a bunting bag given to me by my grandmother when Kate was born to now become a warm cover for Charlotte in her stroller and of course, the normal monthly things like quilt meetings and bees, an executive quilt meeting , writing group meetings ... and there is probably more that have slipped my mind.
     Did I get a chance to quilt! Yes ... I finished the "Crossing the Harbour" piece (a picture of that at a later date); I am working on a second possible entry piece for the SAQA Corner of My World (due by the end of this month!) and ...
     I have started a Colour Study.  Originally I thought to do the same picture (eg a door or a window) in the different colour styles, but my daughter has decided to challenge me. She has taken one of her pictures from when she lived in St John's Newfoundland and cut it into 9 sections. Randomly, I am given a section and must apply a colour challenge to it.

 Challenge #1: Complementary Colours
     Obviously a roof line with power lines running through it .... I chose orange & blue.
     Usually when working on an art quilt, I give myself a little leeway on the exactness of the picture ... but I don't think I can do that this time .... the roof lines and the power lines will need to match up somewhat closely to the pictures on either side of it.

Challenge #2:  Analogous Colours
     I chose yellow-green as the main colour along with yellow and green.
     Although I have been given a grey photograph, my daughter laughed when she saw my finished piece ... the original colour of the house in the centre is actually yellow!
     I still have a little more detail to add to the house. Each finished block is approximately 10 X  8 inches. When all the blocks are done, the final picture will be approximately 30" X 24"

Triadic and Tetradic are the next two to do. :-)


Wednesday 7 October 2015

Pictou Retreat

     At the end of September, I (along with 63 other quilters) spent several days at the Pictou Lodge overlooking the Northumberland Straight. I was lucky enough to be in Laurie Swim's class at the front of the main building where we had large windows ... we could see PEI and the ferry travelling back and forth, as well as watching the waves crash onto the shore, the birds flying overhead ....
     Funny thing ... even though the view was awesome, I actually spent more time working at my sewing machine than looking out the window!
     Laurie taught us several techniques that I hadn't used before ... once her mini-lesson was over, we'd all head back to our machines and practice; another mini-lesson and more machine work, repeat and try again.
     During an early morning walk before class, I picked up several weeds, grasses and flowers.  Our first class had us doing a light sketch on Solvy (water soluble), adding 2 layers of fine mesh behind it, and with an embroidery hoop and free motion thread-painting, creating one of our 'finds'.  After dissolving the Solvy and trimming the mesh, I placed my 'flower weed' on a small piece of fabric and batting and machine-quilted my sample.
     We tried this technique on a couple different backings .... I decided to make trees and compare their structures when done on mesh, tulle, water-soluble interfacing ... deciding that I liked the Solvy & tulle combination the best.

My first tree drying on a styrofoam meat tray after washing out the Solvy.

     Dry and keeping it's shape ... still have some trimming of the mesh to do.  I found the tulle easier to trim than the mesh.  The trees shrunk a wee bit when washing the Solvy out; something to remember when making an item for a landscape quilt.
     I added my tree to a 7in X 7in  background to make a 'sample piece'. The sky is a piece of satin with a bit of transfer paint.
     We also practiced making random leaves cut with a rotary pinking blade, placing them between 2 sheets of cling-wrap and free-motion sewing over them. After ironing them (between papers) to melt the plastic, a spider web of leaves was created which could be trimmed  .... I left my first sample as is, trimming some of the loose threads and adding it to my 7X7 sample blocks.

     Then I decided to get a little creative with the random leaves and cut the threads to produce a vine of leaves ... creating a "C" for my granddaughter.  The red bits are felt pieces. Kind of looks Christmasy.
     Back to my trees ... I really enjoyed making them. On this sample, I have used knobby wool strands as part of the ground along with felt as the ground cover.  The reds and blacks in the sky are angelina fibers.
     We also worked with freezer paper for outlines and shapes, transfer paint, using real leaves, resists and discharges, applique methods, and framing.  Some techniques I already use, a couple I am not likely to use, and several ... like my trees will find their way into future landscape quilts!!
     At the end of the class, we were to create a final piece using the different techniques. The sky and the water are done with transfer paints; the leaves are part of discharged lace.  I didn't finish this piece ... we were using a different type of backing and my sewing machine decided it didn't like it. I have ordered a spring-loaded quilting foot that should make it a bit easier ... when it comes in, I will try to finish up my final sample.


First Place

     Last spring I created a 'Challenge' piece for the IWK hospital - Mayflower Quilt Guild show & sale that was held this past week. We were given 4 pieces of fabric and could add whatever fabric we wanted as long as the original 4 pieces were prominent in the finished work.  The 4 colours were the multi-print in the border, the blue in the water, and the orange & purple in the sunset.
     My 'Sailboat at Sunset' won Viewers' Choice!!
     The prize: a gift certificate to TLC -Bedford to have free machine quilting done for a queen-sized top!

Monday 21 September 2015

September

     Somehow 3 weeks have gone by in September  ... I think there are less hours in a day since I don't seem to have finished quite as many projects as I had planned!!

     My kitchen cabinets have been repainted; a 3 day job that took 5 days with a non-working weekend in the middle of it all. They are now a lovely shade of light grey instead of oak; the colour is actually called "drizzle" which goes along with the grey colour in the living room -- rain cloud. Two Rubbermaid containers are full of items that will not be going back into the cupboards; next stop is a thrift store to drop that off.

     I managed to finish the binding on a quilt, along with a hanging sleeve. I have 4 quilts that will be in the IWK-Mayflower Quilt show the first few days of October.


    The first one is called a Disappearing Hour Glass ... a variation of the Disappearing Pinwheel that I made a couple years ago.
     The fabric for much of the olive & rust coloured quilt I picked up in a little quilt shop in the Appalachians (Virginia?) years ago. Our quilt guild had a Sampler Quilt challenge, a great way to use up a couple packages of fat quarters.
     Another quilt using up colours that I no longer have in my bedrooms ... all of these are on a queen-sized bed. With mattresses being much thicker these days, I think I need to make the drops a little longer.
     This quilt is a 'mistake.
     It was not meant to be king-sized!
     All those small squares should have been 1 3/4 inches NOT 2 1/2 inches. A quilt kind of grows when the individual pieces are bigger than they should be. I could have stopped sooner, but my goal was to include the cream colour on the outside edge along with the matching cream/beige fabric next to it.
     Oh well, live & learn!

     So ... also in September, my daughter from Mississauga visited (you can see the original colour of the cabinets in this picture); Charlotte loved her aunt!

I attended a workshop on machine-quilting (which I NEED a lot more practice) and I gave a presentation on an 'intro to quilting' along with a trunk show. And of course all the normal day-to-day stuff like taking the CRV in for a service check, renewing the license (& replacing it since the old one was peeling) and starting up the fall quilting meetings.
     This week I  leave for quilting retreat in Pictou (really looking forward to that ... getting to work with Laurie Swim!!) and if all works out well, on Sunday afternoon, I hope to drive to Inverness to attend the next opening of the SAQA Atlantic Canada show.
     Then September will be done and I can hope to accomplish in October the things I meant to finish up over the summer !!

Friday 28 August 2015

Ice Dyeing Again

     A lovely box from Maiwai Ltd in Vancouver arrived two weeks ago with several tins of powdered fabric dyes. I've been dying to try them out (no pun intended).
     I decided to experiment with three types of fabric -- all cottons but several small pieces were pre-washed in a soda ash solution, a couple were bought already prepared to be dyed and the last couple fabric samples were machine washed to remove any sizing. Safety pins were attached to the corners so I would be able to remember which fabric was which.
     The bin is from a local fishing supply store, I wanted something sturdy enough to be used outside even when the weather gets colder. I picked up a couple of dish-drying racks from the Dollar store ... a good fit but since they were light-weight plastic, once I put the ice cubes they started to buckle a bit ... the fasteners I used to help secure them, didn't work in the end. If I see some cheap wire-framed dish racks I'll pick them up.
     Some of the material I scrunched up, some I folded like a fan or in squares, others I twisted in a coil ... tried a variety of things to see what results I liked best. In the end the scrunched, fan-folded and the twisted ones were my favourites. The ones folded in a square & rectangle didn't work so well beyond a couple layers. There is some fine netting over the rack to stop the ice cubes from falling through ... should have confirmed that the clips actually held the netting in place ... some ice cubes chose to fall through the sides and not do their intended work!

A couple bags of ice followed, I put on a face mask and then  added the dye.
     I know if 3 or more colours are placed on the same area it will turn a muddy to dark brown. I tried to keep the colours relatively separate only overlapping a little to get a small mix of colour. When I did the ice dyeing workshop last month, I think the dyes we used were a little more granular than what I had ... or maybe the difference was that my dyes were newer, or maybe it was because it has been so humid out ... my dye powders seemed to clump and it was difficult to get a good spread of colour.
     The following day turned out to be rather rainy .... with the ice melted, I took everything outside & rinsed the fabric and the container with the garden hose .... and decided to let the rain do the final rinse with the fabric pieces hanging on the clothes line.
      I haven't bothered to use a 'salt wash' to secure the colours ... these fabrics will be used in art quilts and I am not planning on them being washed.
     General results: I'm not too crazy about the moss green colour ... it turned rather muddy; I do have two shades of green and may try it again with both greens.  Love the turquoise and will try that again with the 2nd shade of darker blue that came. One of the scrunched pieces in blue will make a great sky piece of fabric.  I like the fuschia colour, it kept its bright colour the best, but I don't use a lot of fuschia in my work.
     The next plan is to dye some fabric without the ice ... that hopefully will give me more intense colour. My daughter saw some dyeing ideas on Pinterest, one using tissue paper overlays on fabric; that might be interesting to experiment with as well. We shall see ...


Monday 24 August 2015

Two shy of 1000

     By tomorrow 1000 people in 16 different countries will have looked at this site ... who knows, maybe even by the end of today. That's kind of neat! :-)

     The past week and a half has had very muggy weather ... everything sticks. The material won't glide smoothly on the sewing machine, material sticks to the rotary cutter and the cutting board, paper used for making templates wilts in my hand. It feels like I could just reach my hand up and squeeze the air and rain drops would be produced.

     I've added more detail to the MacKay Bridge ... the bridge itself took approximately 5 hours to complete, in small bits of time since it was too humid to sit anywhere for any length of time.
     I like the clouds/sky better in this picture than in one of the others I am working on.
Still not totally satisfied with the smoke stacks (by the way, an electrical storm on Saturday late afternoon & again early on Sunday morning managed to hit the power station & a transformer knocking out power twice for most of the city and surrounding area.) I live just to the left of those chimneys .... the night explosion scared the crap out of me!)
     Anyway, back to quilting .... I think the problem of the chimneys is the red fabric: after I satin-stitched the edges I noticed the fabric was fraying a bit ... although a perfect colour, the weave is a little loose.  I should add shading with some gray thread to the smoke stacks.
     Several of my photos of the bridge had the bow of a large ship sticking out close to the bridge footings ... I eliminated that so the buildings could be shown coming down the hill.
     My daughter came by for a 'colour consulation'.  I always like it when we pull out several pieces of fabric to use for sashing and borders and end up choosing something pretty similar. She has an Arts degree and a really good sense of colour  ... its good to know I am on the right track!

Sunday 16 August 2015

New Rules

I've decided to add two new rules for quilting.
1. When something is working, don't stop. When the bobbin runs out, don't take a break but refill it and keep going until you finish the section you are quilting.
2. When you return after taking a break and things stop working: stop, walk away from it and come back another time. No one should spend time taking out a bird's nest or realize that you adhered the next fusible piece to the wrong section.

     I've started to work on the 3rd piece for Crossing the Harbour. It still needs more top-stitching but the background is in place and the 3 chimneys of Tuft's Cove are ready to go.

     This bridge / chimney picture is bigger than the original I did for the SAQA Atlantic Canada show, so I have been able to add more detail to the houses and apartment buildings surrounding the power station. Most of the buildings should have the same colour brick, but I wanted more contrast between them. The red sections on the chimneys look a bit wonky up close; stitching over top will solve that problem (I hope). So far, I have drawn, cut and adhered 135 pieces to the background section. I am looking forward to having this part finished so I can start on the bridge.

     The "break" that I took yesterday (after the bobbin ran out of thread) was great ... I did a mini roadtrip: off to Avonport to pick up a 'few' pieces of fabric, across country on a highway that ended up near Chester, a side-trip over to Lunenburg to visit Laurie Swim's quilt gallery (I wanted to check closer how she quilted her skies & water ... can't wait to take her workshop the end of next month) and then on to Mahone Bay 'Suttles & Seawinds' to check on fabric, quilts & clothing,  a couple stops at antique shops and finally a stop in at Sheila's Fish & Chips in Hubbards on my way home.  A worthwhile break even though today, my sewing machine decided it didn't want to cooperate.

Sunday 2 August 2015

Crossing Harbour 2

     The Dartmouth ferry is almost done ... there is a small logo near the door/ramp that needs to be added. I am not totally happy with the sky yet, so I will let it sit for a bit while I work on the 2nd piece.

     I have not been working on this one as quickly as I first thought ... the sun is out and it is finally warm. I'd rather be outside sitting on the deck with a cool drink watching ships go by than sitting inside quilting.  At some point I need to get an estimate to get another window put in my studio space and then I can watch the harbour traffic from inside!
     The MacDonald bridge is still a work in progress: Large shrubs and trees will be added to the foreground at the base of the bridge. My photo shows the underside dark and in shadow but once I did the lower trusses in black and I was looking across at the MacKay bridge from the deck & realized that the underside is actually green (I should have remembered from the earlier bridge quilt that I did!) ... a quick car trip over to the MacDonald .... and yes, it is green too. I added lines of green along the black trusses ... hopefully it looks like shadows on green trusses.

     The next step is to add the orange cables to the far side of the bridge, add detail to the railings (grey strip area) and then the cables to the closer side. I still need to work on making the underside of the bridge on the far end a little more convincing.
     From the location I took the original photo, you cannot see the water but you can see the tops of a couple of roofs ... I am standing at the top of a hill.  I think I might take a bit of 'artist's license' and eliminate the roof tops. When I went back today to confirm the bridge colours, the nearby trees were fully in leaf and the roof tops are hardly visible. 

Thursday 30 July 2015

I Miss Thunderstorms!

This past week has been mostly wet and cool ... hard to believe in the middle of summer, that you  need to wear a light jacket. There have been a couple of small rumbling thunderstorms that everyone here excitedly talks about .... but what I really miss about southern Ontario is a 'good afternoon intense thunderstorm' or an overnight show of lightning flashing through the dark sky followed by the long roll of thunder.  You don't get good convection air currents next to the ocean, and as much as I love to see the fingers of fog stretch up the harbour, an occasional convective thunder storm would make my day (or night).

So ... during the wet, cool days of the past week, I decided to read and then read some more. A friend mentioned the Goodreads.com site .... and I reserved a few interesting books through the local library. As would be expected, all the reservations came within 3 days.

I also tried dyeing some fabric with what I had around the house .... liquid dyes and ice are a lost cause!  The dyes coagulated on the ice and left little blobs on the fabric. Large areas of the fabric remained white ... which I guess in the long run is a good thing. Now I can reuse most of the fabric with the powdered dyes I will now order on-line.

Saturday 18 July 2015

Halifax Harbour

     On the same theme as the bridges "Crossing Halifax", I've decided to work on "Crossing the Harbour" or maybe "Crossing Halifax Harbour". It will consists of 3 landscape quilts: the MacKay Bridge (which I've done before), the MacDonald Bridge and the Dartmouth-Halifax ferry.
     So far I have been working on the ferry.
     This is the Halifax skyline ... I realized that some buildings didn't quite follow perspective so I trimmed a couple. I am not sure how I want to quilt the sky since the day I stood at Alderney Landing to photograph the ferry coming to dock, the sky was a smooth pale blue with no wispy clouds.
     I just remembered: I meant to add the tugboat: Theodore, a "little" bright yellow tugboat with an orange hat and a big smile on the bow.  I may add him later, tied up along the wharf.
     I added the ferry today ... it needs a lot of thread-painting to give it some character. It needs an antenna or two & a flag on top. I also realized when I looked back at my photograph that there is a church steeple about mid-picture -- will add that, but I am going to leave out the large cranes that seem to be popping out of the top of a couple highrises.
The next challenge will be adding the waves to the front of the ferry and in its wake.  (Unlike the sailboat quilt, I won't be creating large waves so there is no need of extra dark water that might be mistaken for minke whales!!)
 Original photograph of the ferry "Dartmouth II" crossing Halifax Harbour.